Guide
How to use Mira
Go from your first idea to a finished video. Open any screenshot to see it at full size. Uploading and preparing references does not start a video. Press Generate when your references and settings are ready.
Step 01
Sign in
Sign in with your DinoTrace username and password. Mira uses the same sign-in and does not keep a second password of its own.
The first time you sign in, Mira sets up a home for your videos. Your name then appears in the header.
If Mira asks you to sign in again on Generate or Assets, use that page’s Sign in again button. Your prompt, settings and selected references stay on the page when you use the same account. Keep the tab open; nothing is submitted automatically. A different account opens a fresh page.
You stay signed in for fourteen days. Do not sign in over and over in a few minutes: that can block sign-in for a short while, and only waiting clears it.
When you are done, press Sign out in the header. Each sign-in also opens a session with DinoTrace, and Sign out closes it. Fifty open sessions block sign-in until they expire, so do not just close the tab.
Step 02
Choose a model and describe your video
Open Generate. Choose Seedance 2.5 in Generation settings when you want to use reference images, videos or audio. The model list comes from your DinoTrace account; availability and accepted settings depend on that account.
Describe the subject, action, setting and camera movement. For example: A slow camera move across a quiet lake at sunrise. You can make a video with just a description, or drag files into the sections below it.
There is no upload-mode button. First frame, Last frame, Reference images, Reference videos and Reference audio stay visible. Drag files directly into the section that describes their purpose; clicking an empty area does not open a picker.
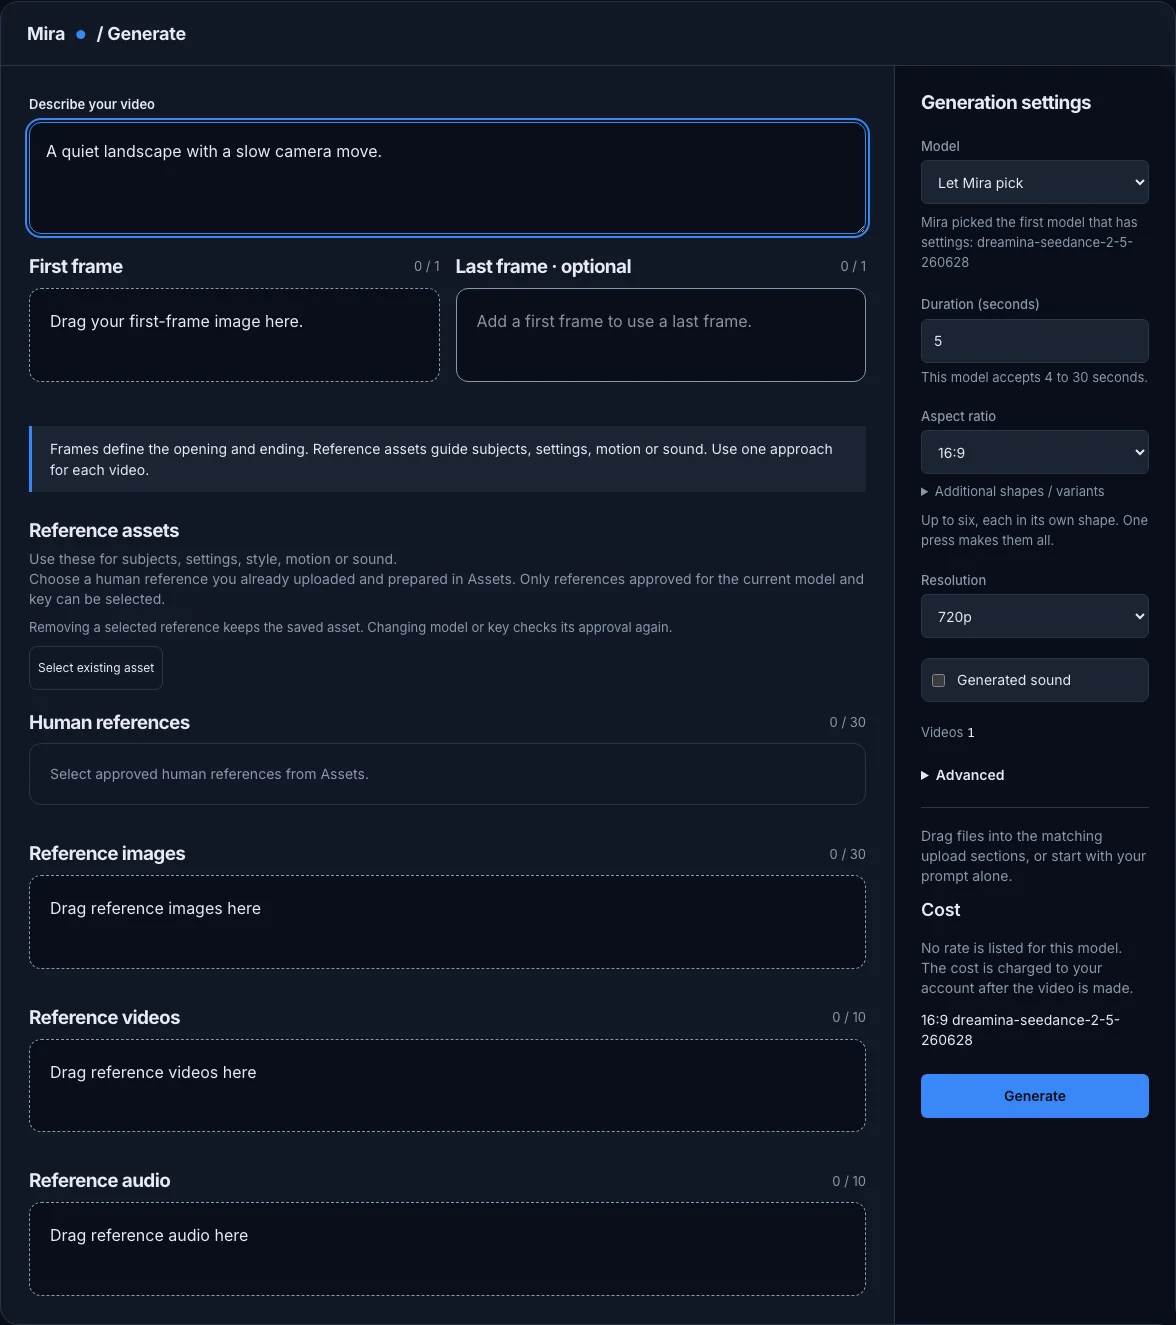
Start with a description. The upload sections are already open beside Generation settings. Step 03
Save your reference material in Assets
Open Assets to upload images, videos and audio before generating. Drag files into the matching section. Human references have their own section for photos of people. Keyboard users can Tab to a file chooser; clicking an empty drop area does not upload.
Uploaded files appear in Saved assets. Use in Generate opens a composition with that reference selected. Refresh assets reloads the list; Next page shows more saved files. Generated videos remain in Library.
Removing a file from a composition or preparation area only detaches it. Delete asset removes the saved reference from Mira after confirmation. It does not delete copies already held by the provider.
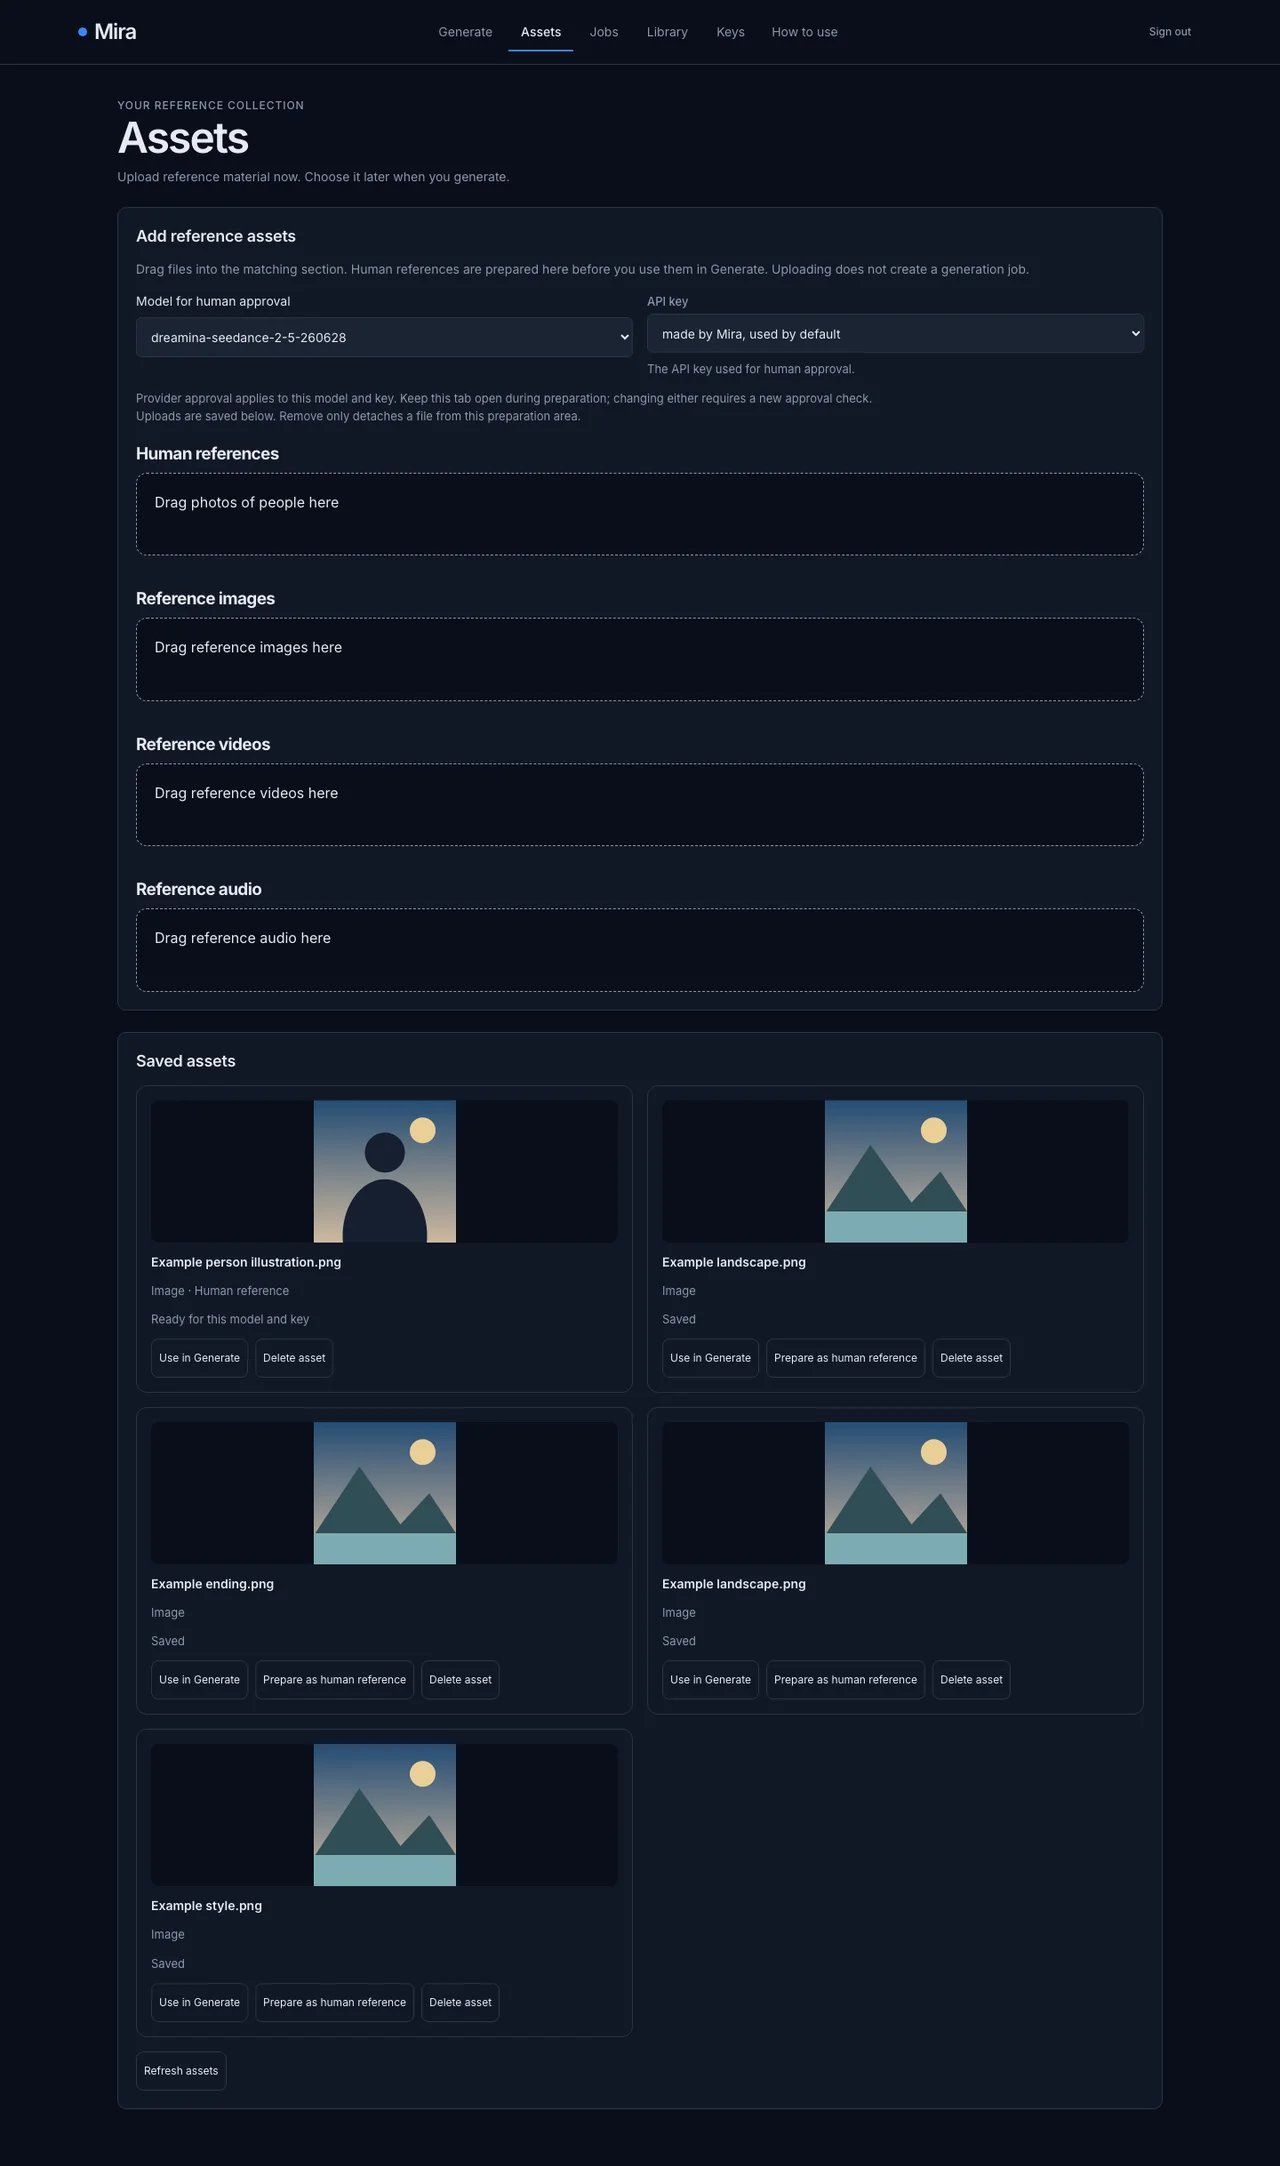
Save material first, then choose it when composing a video. Human preparation happens here. Step 04
Prepare people in Assets, then select them in Generate
In Assets, choose the model and API key for human approval, then drag a photo into Human references. Preparation starts after the upload is checked. Keep the tab open while the card says Checking approval. Approved for Seedance 2.5 means you can use the photo with that model and the selected API key. For an existing photo that needs approval, select Request approval.
A failed preparation explains what happened. Use Retry approval when offered, or try again later and contact support if the problem continues. If approval could not be checked, refresh the saved assets or sign out and sign in again. This does not mean the reference needs to be uploaded or prepared again. Photos of people remain subject to provider approval. Changing the model or key requires approval for the new choices.
In Generate, Human references only selects saved assets. Press Select existing asset to open the asset picker over the page, then choose a reference approved for the current model and key. Close asset selection, Escape, or the dark area around the picker returns to your composition. Uploading and preparation happen in Assets. Generate stays unavailable while any selected human reference is not ready; remove that selection to clear its blocker without deleting the saved file.
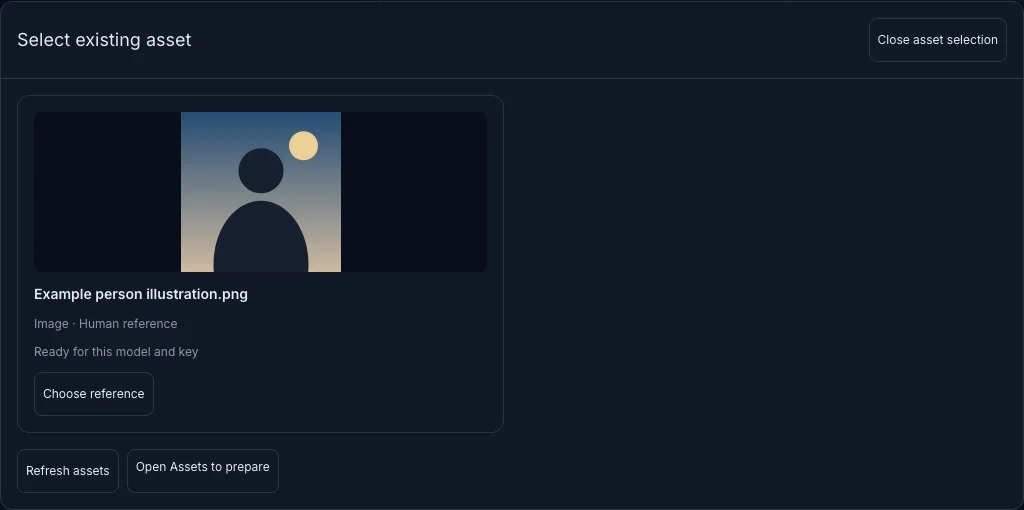
The picker opens over your composition. Choose an approved reference, or close it to keep composing. Human uploads stay on Assets. Step 05
Guide the opening and ending with frames
Drag one image into First frame to define the opening. Last frame becomes available: drag one image there if you also want to guide the ending. A last frame needs a first frame.
Seedance 2.5 sets Aspect ratio to Adaptive when a first frame is present. You do not need to select a shape, and incompatible shapes are unavailable. Remove the frames to restore your earlier shape choices.
Frames and reference assets are different approaches and cannot be combined in one video. The unused sections stay visible with an explanation. Move or remove the current approach's files before adding the other; Mira does not silently discard them.
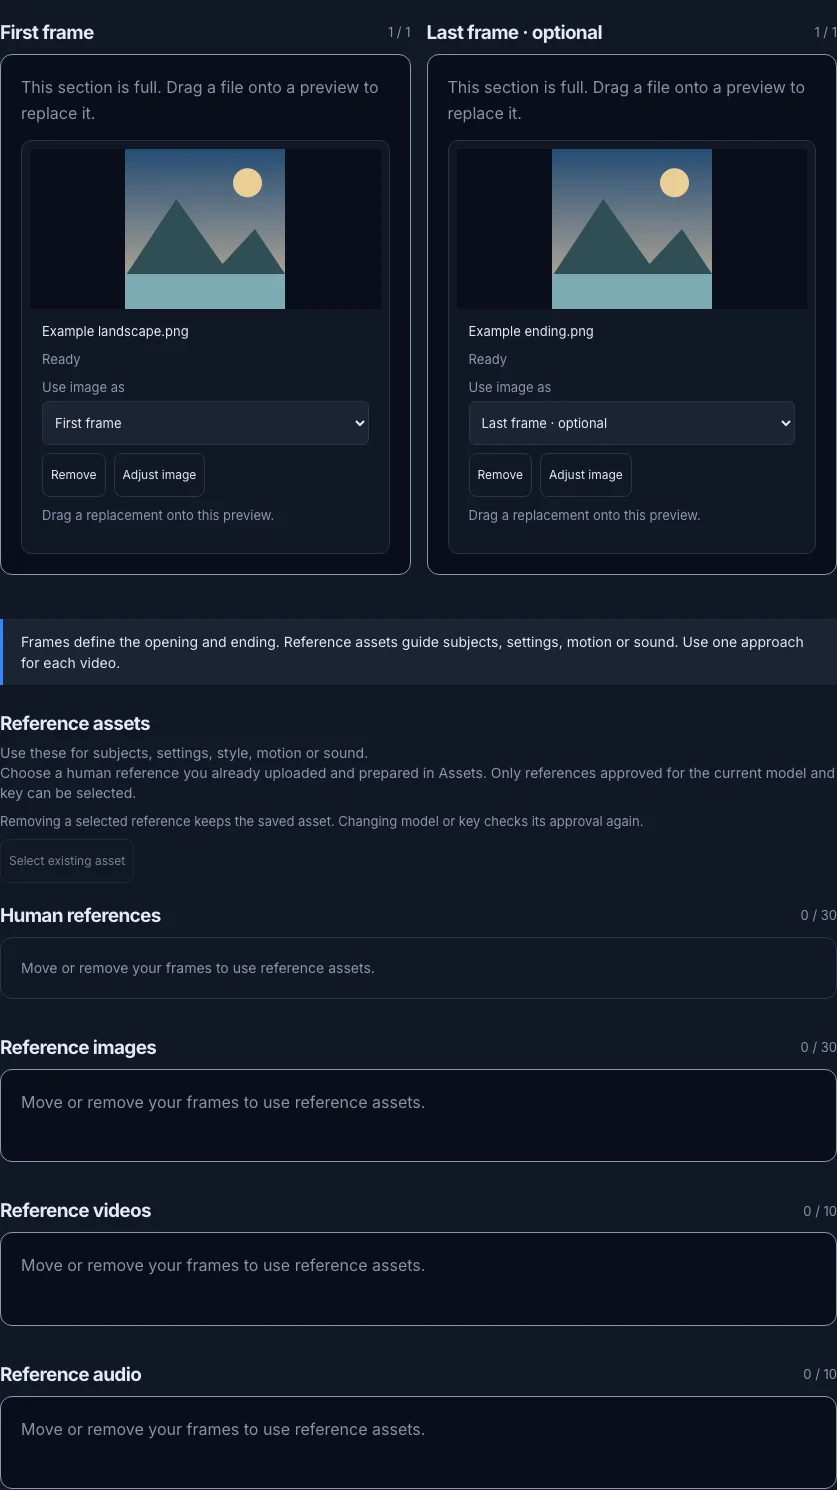
Two frames guide the opening and ending. Adaptive follows the first frame; reference sections explain why they are unavailable. Step 06
Combine reference images, video and audio
Use Reference images for subjects, locations or visual style. Use Reference videos for motion or camera movement, and Reference audio for sound. Drop several files into the matching category. Seedance 2.5 also accepts audio-only references. Seedance 2.0 requires an image or video with audio.
Click a file's reference label to insert it into your description, such as [[image1]]. Then explain its role: Use [[image1]] for the setting and follow the camera motion in [[video1]]. These labels stay linked to their files when you reorder them.
Use Earlier and Later to reorder references. If you remove a file whose label is in the description, remove or replace that label too.
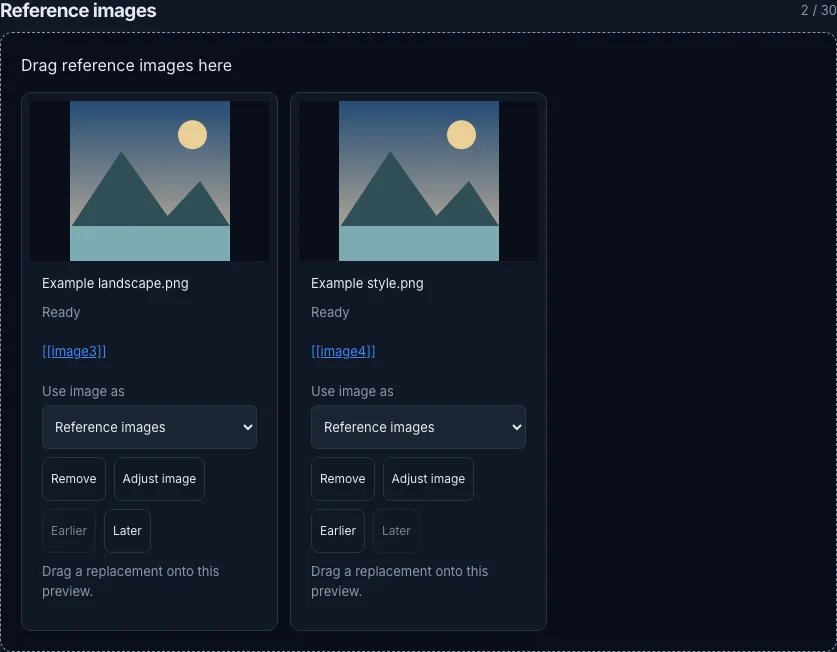
Image references guide visual details. Use the video and audio areas below them for motion and sound; each preview has its own reference label. Step 07
Check every upload before generating
Images show thumbnails; video and audio show playback controls. Wait until every file says Ready. Uploading and checking take time. Ready means Mira checked the file, not that the model has accepted or made your video.
Use Assets for human-reference upload and approval before selecting it in Generate. The ordinary frame and reference sections still accept drag-and-drop files.
An error stays beside the affected file and explains what to change. Retry a failed upload, remove it, or drag a replacement directly onto its preview. Replacing a file keeps its reference label. Use image as moves an image to an available role. Tab reaches the file chooser when you need keyboard access.
The selected model controls file counts, sizes, dimensions and durations. Changing models keeps your files and explains any incompatible combination. Resolve every warning before generating; the same checks also apply when the request is sent.
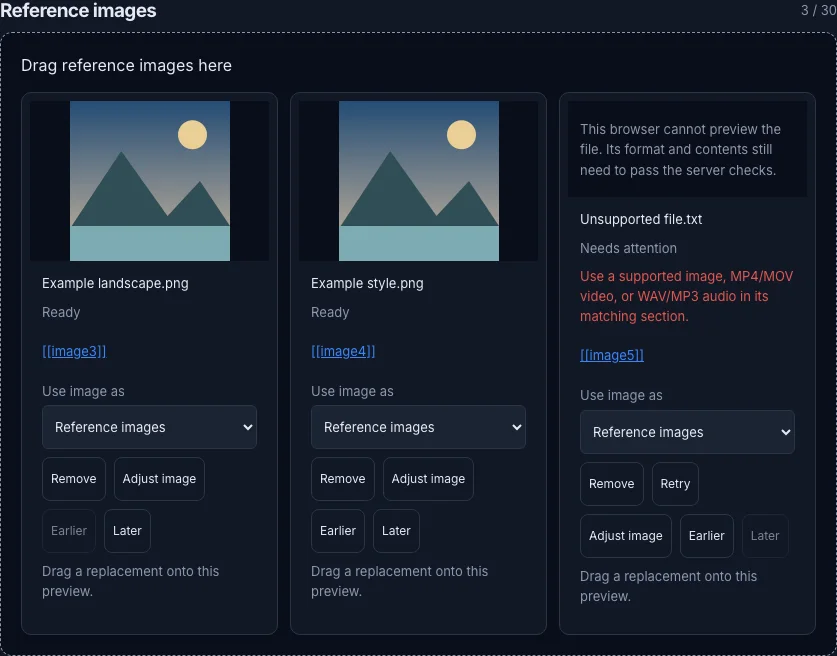
A rejected file stays visible. Correct or replace it instead of starting the whole composition again. Step 08
Preview a resize, trim or compression
For an image, choose Adjust image. Set Longest edge in pixels and JPEG quality, then choose Preview adjustment. Inspect the resized preview before choosing Use adjusted image. Cancel leaves the current upload in place.
For video or audio, choose Trim / compress. Set the start and end time; video also offers size and compression controls. Preview adjustment prepares a playable version on your device. Apply it only after checking the result.
Your original file stays unchanged. Applying an adjustment uploads and checks a new version. Use Restore original to return to it. Large clips may exceed your device's processing capacity; if that happens, prepare the file in your usual editor and drag it back in.
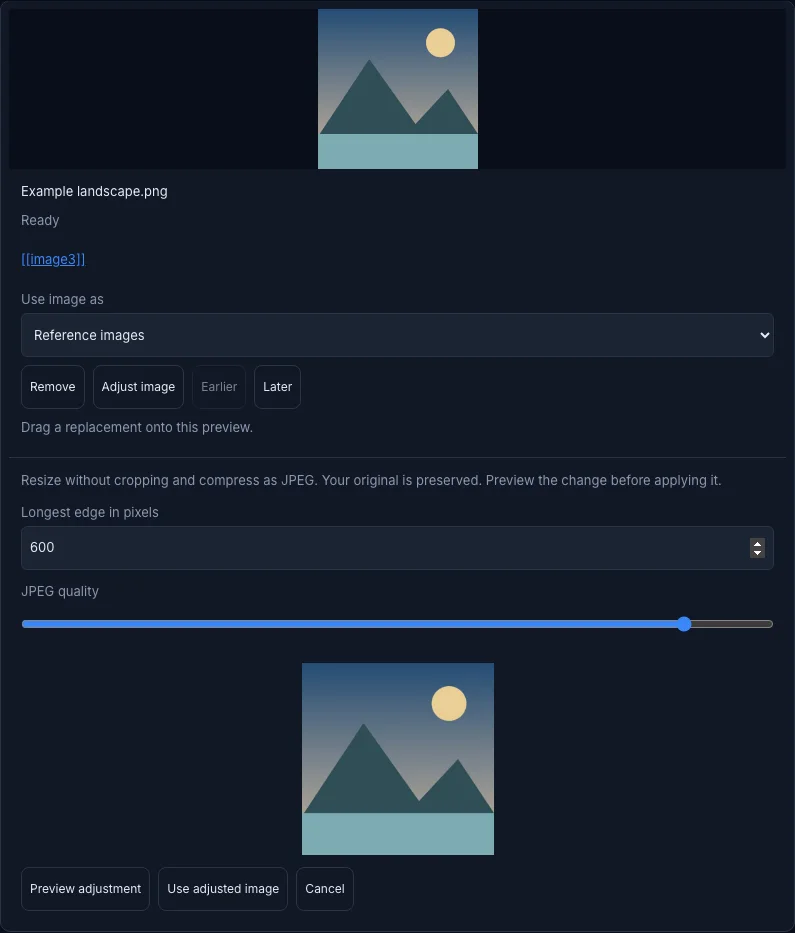
Preview first, apply second. A new upload is checked after you choose the adjusted version. Step 09
Check settings, cost and the number of videos
Set Duration to 10 for a ten-second video, or another length the model accepts. Choose Resolution and Aspect ratio where available. Generated sound controls the output's sound; Reference audio supplies an input for the model to follow.
Additional shapes / variants lets you request more than one video, up to the limit shown. Check the Videos count: one press makes them all. With first-frame input, keep the automatically selected Adaptive shape.
Open Advanced to find API key. It chooses which eligible key on your DinoTrace account pays for the video. Under Cost, review the listed rate and output summary; the exact charge appears after generation. When every upload is Ready and the settings are valid, press Generate once. The request starts straight away and cannot be called back.
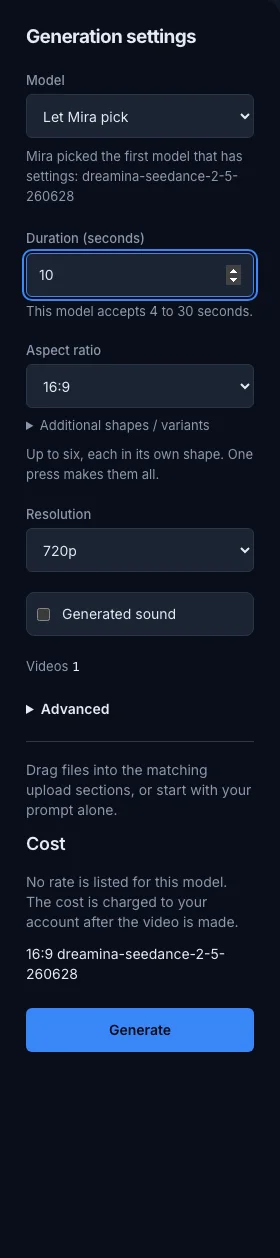
Review the duration, shape and Videos count before pressing Generate. More variants make more videos. Step 10
Watch it in Jobs
Each request appears in Jobs, newest first. Its title is the first words of your description, and if you started from a photo the photo is shown beside it. Show details opens it to show each video on its own.
Use Model, Status and the date fields to find a request, then press Apply filters. Dates use UTC. Matching requests keep all their videos together, including videos with another status. Clear filters shows everything again.
Jobs shows up to 20 requests at a time. Next opens older requests; Previous returns to newer ones. The list refreshes itself every few seconds and keeps your filters. You do not need to reload the page.
Give it a few minutes. A five-second video took about two and a half minutes the last time it was measured, so a row that has not moved yet is normal. Jobs names each stage in plain words.
If a video stops, the row says so and gives the reason in plain words.
Step 11
Find a video in Library
Library shows up to 24 finished videos at a time, newest first. Each card shows a saved preview image, your prompt, the model and its approval state. The grid stays still; open a card to watch the video.
Choose a model, approval state or Date range, then press Apply filters. Dates use UTC. For your own dates, choose Custom before setting From and To. Open More filters to choose a campaign or market when available. Remove an active filter chip or press Clear to reset your choices.
Use Next and Previous below the grid to browse matching videos. Back to newest returns to the newest matching videos and keeps your filters. If nothing matches, clear a filter or widen your date range.
Preparing preview means Mira is making the card's image. Refresh Library after a short wait. Preview unavailable means the image could not be shown; it does not mean video generation failed. You can still open the card to check its video page.
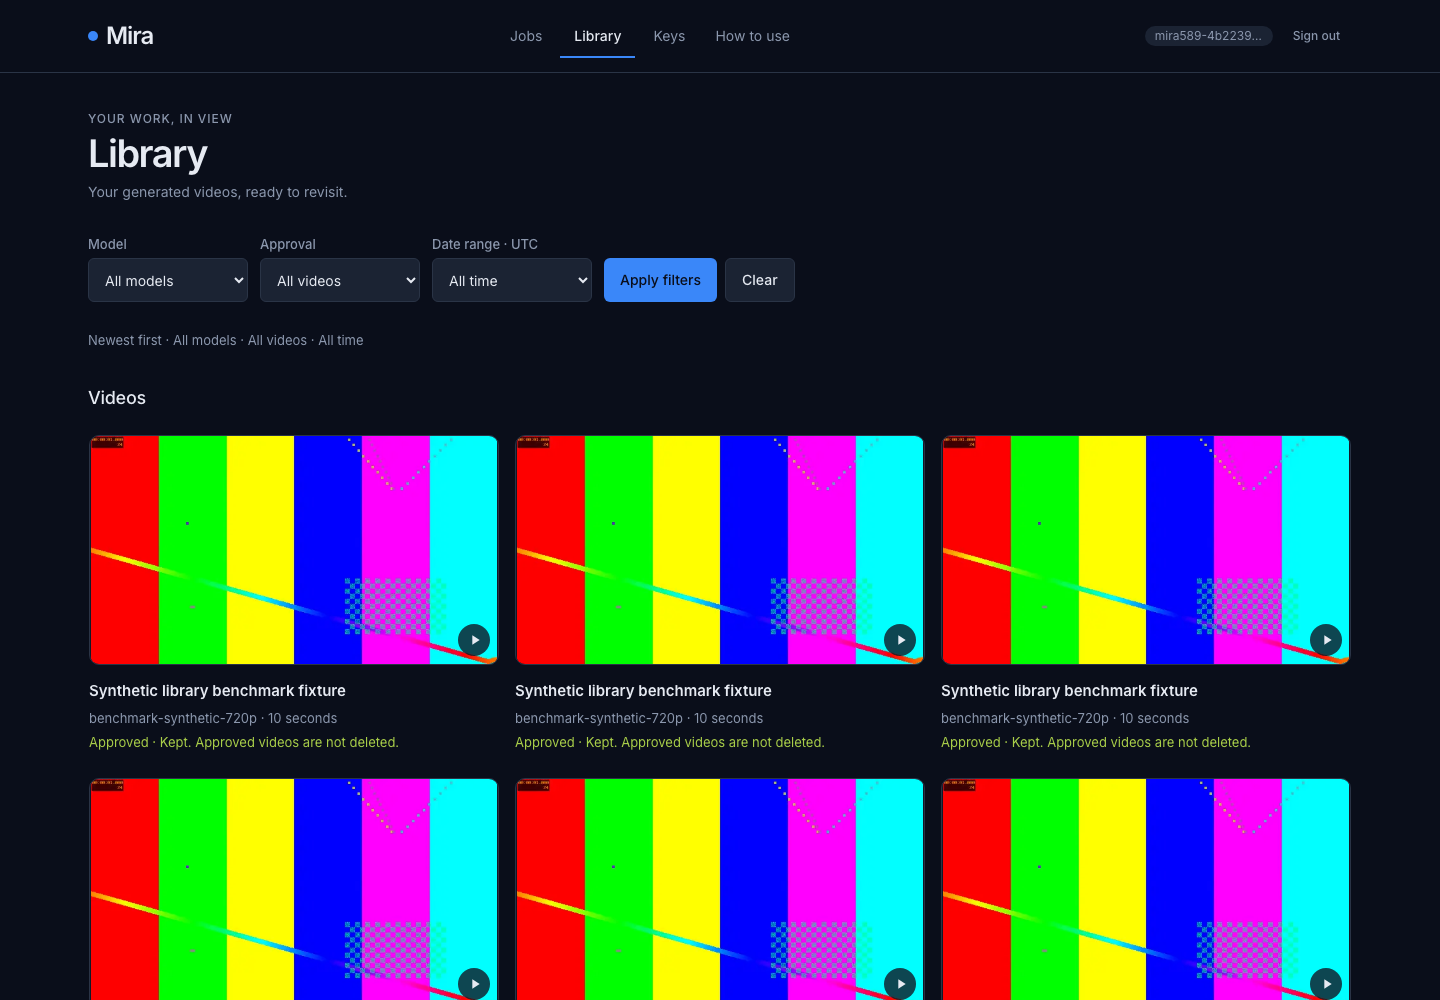
Filter the grid, then open a card to watch. These example videos use test patterns. Step 12
Play, download and keep a video
Open a Library card and press Play in the video player. Use its timeline to move to another point in the video. The page also shows your prompt and generation settings. Download video saves the video to your device.
Play and download links work for fifteen minutes. If a link expires, reopen the video page to get a fresh link. If playback is unavailable, read the explanation on that page.
Check the retention message before leaving. A draft video normally expires after 90 days. When offered, Approve keeps it from expiring, and Keep this longer extends its retention. Back to Library returns to the grid.
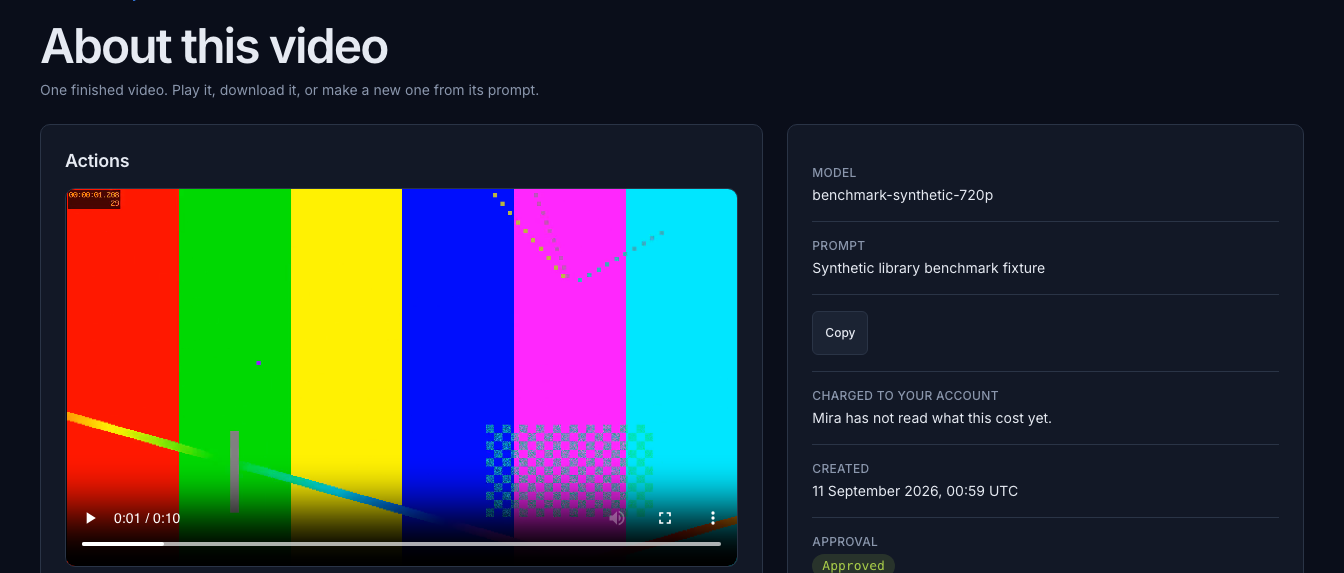
Open a card to play its saved video and read the details. This excerpt shows a test-pattern example. Step 13
Your API keys
Keys lists the API keys on your DinoTrace account. Mira shows them but does not own them.
One key is already there. Mira made it the first time you signed in, and uses it unless you choose another. You can make more, name them for wherever you plan to use them, and give one an expiry date or limit it to certain models.
The list shows each key masked. Show key shows the whole key with a Copy key button. You can show it again any time, so there is no need to save a copy.
Turn off stops a key straight away and changes nothing else. Delete cannot be undone. Every key uses the same balance, so the key you choose never changes the cost.
If the screen asks you to sign in again, nothing is wrong and your keys are untouched. Mira's permission to read them lasts a shorter time than your sign-in.
Step 14
Your balance and spending
The home screen shows your prepaid balance, what you have spent so far, and the total prepaid, in dollars. The three figures match your DinoTrace account to the cent.
What each video cost is shown on Jobs and on the video's own page once it has finished. The amount is read from your DinoTrace account. Mira works none of it out.
Where Mira has not read a cost yet, no cost is shown. There is never a zero and never the word free, because a video that cost nothing and a cost Mira has not read yet are different things.